

We have all experienced this exact flavor of social media frustration. You spend twenty minutes capturing the absolute perfect photograph on your smartphone. The lighting is immaculate, the composition is flawless, and the subject is perfectly framed. You open up Instagram, select the image to post, and suddenly, disaster strikes.
The Instagram application aggressively zooms in on the center of the image. The beautiful landscape in the background is completely cropped out. The top of your head is missing. You try to pinch your fingers on the screen to zoom out, but the app stubbornly snaps the image back into its restrictive square box. You are forced to post a butchered, zoomed-in version of your masterpiece, entirely ruining the composition.
This phenomenon is not a glitch; it is the strict enforcement of algorithmic aspect ratios. Every major social network—from X (formerly Twitter) to LinkedIn, Facebook, and Instagram—has highly specific pixel dimensions required for their feeds. If you do not proactively format your images to meet these exact dimensions, the platform's backend servers will aggressively, automatically crop them for you.
In this definitive guide, we will break down the mathematical concepts of aspect ratios and pixel density. We will provide you with the ultimate cheat sheet for social media image dimensions in 2026, and show you exactly how using a dedicated online image resizer can guarantee your photographs always look exactly as you intended.
Understanding Aspect Ratio vs. Pixel Resolution
Before we dive into the specific requirements for each platform, it is critical to understand the difference between aspect ratio and pixel resolution. These two terms are frequently confused by beginners, but they dictate entirely different properties of an image.
What is an Aspect Ratio?
Aspect ratio refers strictly to the proportional relationship between the width and the height of an image. It has absolutely nothing to do with the actual physical size or the file size; it only dictates the shape. It is written as two numbers separated by a colon (Width:Height).
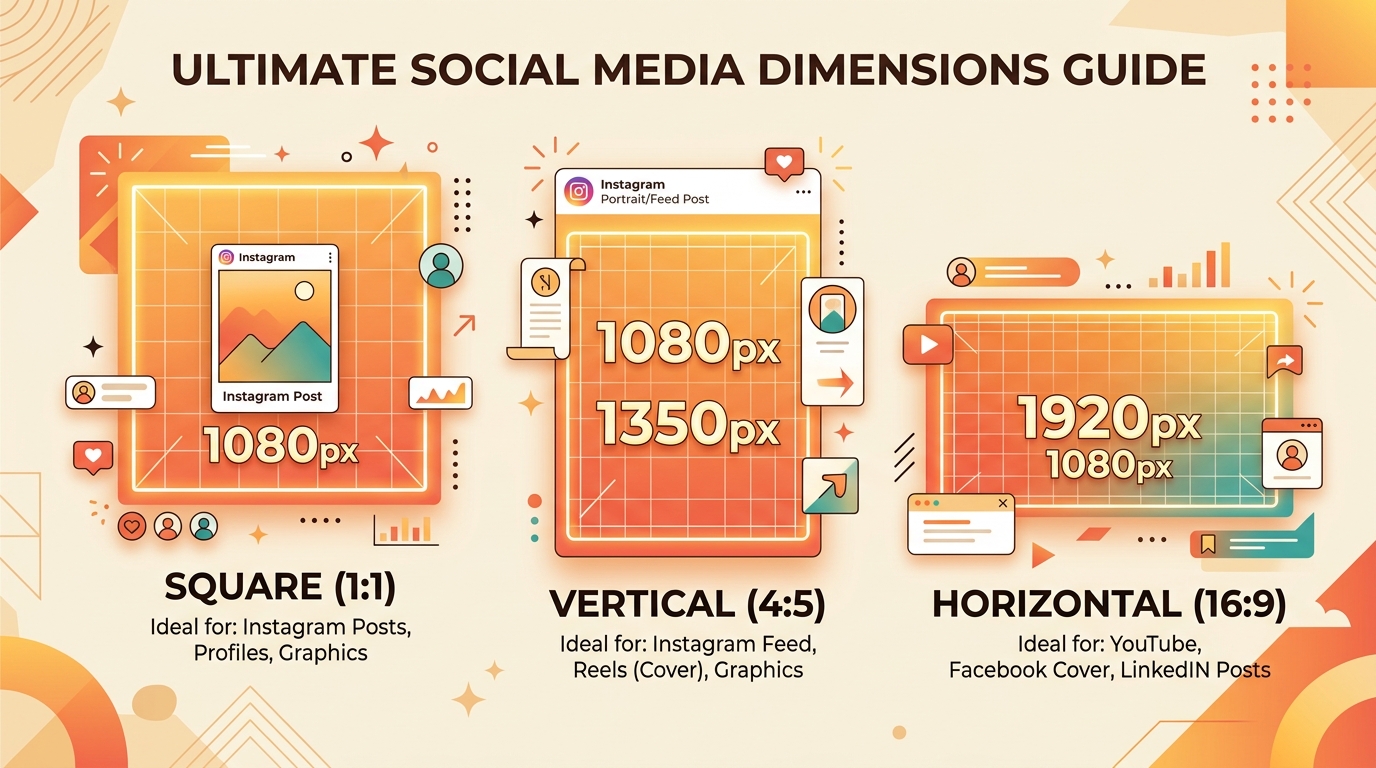
- 1:1 (Square): The width and height are perfectly equal. This is the classic, original Instagram format.
- 16:9 (Widescreen): The image is significantly wider than it is tall. This is the standard format for YouTube videos, cinematic photography, and modern computer monitors.
- 4:5 (Vertical Portrait): The image is slightly taller than it is wide. This is currently the most heavily favored format for the Instagram feed.
- 9:16 (Full Vertical): The image is extremely tall and narrow. This is the aspect ratio of your smartphone screen when held upright, used exclusively for TikToks, Instagram Reels, and YouTube Shorts.
What is Pixel Resolution?
Pixel resolution refers to the actual, literal number of digital pixels that make up the image. For example, an image that is 1080 pixels wide and 1080 pixels tall has a 1:1 aspect ratio. However, an image that is 500 pixels wide and 500 pixels tall also has a 1:1 aspect ratio.
They are the exact same shape, but the 1080x1080 image contains significantly more data, resulting in a much sharper, higher-quality viewing experience. When preparing an image for social media, you must satisfy both requirements: you must hit the correct aspect ratio (shape) and provide enough pixel resolution (sharpness) so the image doesn't look blurry on modern Retina displays.
Uploading a 16:9 landscape image into a platform demanding a 4:5 vertical feed guarantees that over 40% of your image's width will be violently cropped off by the algorithm.
The Ultimate 2026 Social Media Cheat Sheet
Social media companies constantly update their UI layouts, which means their optimal image dimensions change frequently. If you are running a brand account, a marketing campaign, or just want your personal photography to look crisp, bookmark this cheat sheet and use your Image Resizer to hit these exact targets.
Instagram Dimensions
Instagram is notoriously strict with its cropping algorithms. If your image falls outside of these parameters, it will be cropped without your permission.
- Profile Picture: 320 x 320 pixels (1:1). Remember that the UI will display this as a circle, so keep all critical elements dead center.
- Square Post: 1080 x 1080 pixels (1:1).
- Portrait Post (Highly Recommended): 1080 x 1350 pixels (4:5). Because most users are scrolling on vertical mobile phones, a 4:5 portrait post takes up significantly more physical screen real estate than a square post, commanding more attention.
- Landscape Post: 1080 x 566 pixels (1.91:1). Rarely recommended as it occupies very little vertical space on the mobile feed.
- Instagram Stories & Reels: 1080 x 1920 pixels (9:16).
LinkedIn Dimensions
LinkedIn has historically been plagued by terrible image compression, making it highly vital to upload the exact dimensions requested so their servers do not attempt to re-process your file.
- Company Logo / Profile Picture: 400 x 400 pixels (1:1).
- Personal Cover Photo: 1584 x 396 pixels (4:1). This is an incredibly wide, narrow strip. You will almost certainly need to custom crop a photo to make it fit this extreme aspect ratio.
- Standard Feed Post: 1200 x 1200 pixels (1:1) for squares, or 1080 x 1350 pixels (4:5) for vertical presence.
- Article Header Image: 1200 x 644 pixels.
X (Formerly Twitter) Dimensions
X's feed layout has evolved to prioritize visual media significantly more than in the past.
- Profile Picture: 400 x 400 pixels (1:1).
- Header Photo: 1500 x 500 pixels (3:1). Ensure you leave empty space in the bottom left corner, as your profile picture will overlap this area on the desktop UI.
- Standard In-Stream Photo: 1600 x 900 pixels (16:9) is optimal for clicking to expand, but the feed will generally display it as a 1200 x 675 pixel box.
Marketing Tip: If you are managing multiple platforms, the safest "universal" dimension to shoot for a standard feed post is 1080 x 1080 (1:1 Square). Literally every platform from Facebook to X to LinkedIn will accept a 1080px square without applying a destructive algorithmic crop.
Why You Must Resize BEFORE Uploading
A common misconception is that you can just upload a massive 24-megapixel photograph (say, 6000 x 4000 pixels) directly to Instagram and let the app handle the resizing. While this is technically possible, it is a disastrous idea for two reasons.
First, social media apps use incredibly aggressive, fast compression algorithms. They prioritize server speed over visual quality. If you force their servers to crush a 15MB file down to a 50KB file, the resulting image will suffer from severe banding, color shifting, and artifacting. By using an Image Compressor and Resizer yourself before uploading, you dictate the exact quality of the final file.
Second, algorithms are not intelligent art directors. If you upload a horizontal landscape photo into a vertical feed slot, the algorithm will simply cut off the left and right sides of the image with zero regard for the subject matter. It might crop out your best friend standing on the edge of the frame. By manually cropping and resizing the image yourself, you control the narrative and the focal point of the composition.
Frequently Asked Questions (FAQ)
1. Does resizing an image reduce its quality?
Scaling an image down (making it smaller) generally increases perceived sharpness and hides noise, resulting in a crisp image, provided you maintain the correct aspect ratio. However, scaling an image up (taking a 500px image and forcing it to be 2000px) will absolutely destroy the quality, resulting in a blurry, pixelated mess because the software is forced to invent pixels that do not exist.
2. How do I fix an image if it is the wrong aspect ratio?
You have two options: Cropping or Padding. Cropping involves physically cutting away the edges of the image until the remaining section fits the desired shape. Padding involves keeping the entire original image, but adding solid color bars (usually black or white) to the empty sides to force the overall canvas into the correct shape. Most online resizer tools allow you to choose between these two methods.
3. Why do my photos look blurry on Facebook even when I upload the correct dimensions?
Facebook applies heavy lossy compression to all uploads to save server space. To combat this, ensure your original file is saved in the sRGB color space (not Adobe RGB or ProPhoto), and try uploading the file as a PNG instead of a JPG. Facebook's algorithm is slightly less aggressive on PNG files containing sharp text or digital graphics.
Conclusion
In the fast-paced ecosystem of social media, you have less than a second to capture a scroller's attention. A poorly cropped, awkwardly stretched, or heavily artifacted image is an instant scroll-past. The platform algorithms are entirely ruthless, and if you do not play by their mathematical rules, your visual content will be butchered.
Take control of your own digital presentation. Stop relying on automated in-app cropping tools. By spending an extra thirty seconds running your photography through a dedicated Image Resizer, you guarantee that your audience sees your content exactly as you intended—crisp, perfectly framed, and visually stunning.