

In the modern digital landscape, speed is arguably the most critical metric for any website, application, or digital portfolio. When a user clicks a link, they expect the page to load almost instantaneously. If the screen remains blank for more than three seconds, the vast majority of visitors will simply hit the back button and navigate to a competitor.
Behind the scenes, the absolute biggest culprit of slow loading times is unoptimized media. High-resolution photographs captured by modern smartphones or DSLR cameras are visually stunning, but they carry massive file sizes—often exceeding 5 Megabytes (MB) per image. If a single blog post contains five of these raw images, the browser is forced to download over 25 MB of data just to render a single page. This absolutely destroys your Core Web Vitals, plummets your Google Search ranking, and drains the cellular data of your mobile users.
The solution, of course, is image compression. However, a massive misconception exists among web developers and casual users alike: many believe that reducing file size automatically requires sacrificing visual fidelity. They assume that a compressed image will inherently look pixelated, blurry, or distorted. In this comprehensive guide, we will debunk this myth entirely. We will dive deep into the mathematics of compression algorithms, explain the critical differences between lossy and lossless encoding, and show you exactly how to utilize an online image compressor to reduce your file sizes by up to 80% without a single human eye noticing the difference.
The Anatomy of a Digital Image
To understand how we can shrink a file without ruining it, we must first understand how computers store visual information. A digital image is essentially a massive grid of tiny colored squares known as pixels. A standard 1080p high-definition image is exactly 1,920 pixels wide and 1,080 pixels tall, resulting in a grid of over 2 million individual pixels.
For the computer to render this image, it must store specific data for every single one of those two million squares. Specifically, it stores the exact RGB (Red, Green, Blue) color value. In an uncompressed format (like a raw Bitmap or TIFF file), this requires a tremendous amount of raw data. The computer literally reads a list stating: "Pixel 1 is light blue. Pixel 2 is light blue. Pixel 3 is light blue..." and so on, for millions of iterations.
This brute-force method of data storage is incredibly inefficient. Fortunately, mathematicians and computer scientists realized decades ago that natural images contain massive amounts of redundancy. If the top third of your photograph is a clear blue sky, there is absolutely no reason to store the exact same "light blue" data point a hundred thousand times. Instead, we can use algorithms to write a shorthand rule: "The next 100,000 pixels are all light blue."
This shorthand translation is the foundational concept behind all image compression.
Lossless vs. Lossy Compression
When you upload a massive photograph into an optimization tool, the software utilizes complex mathematical algorithms to rewrite the underlying code of the image. There are two primary categories of algorithms used for this task: Lossless and Lossy. Understanding the distinction between the two is the absolute key to maintaining visual perfection.
1. Lossless Compression: The Perfect Puzzle
Lossless compression, as the name heavily implies, reduces the file size of the image without discarding a single piece of original visual data. It operates purely by finding more efficient ways to write the code.
Imagine you have a physical puzzle. If you put the puzzle together and place it in a large, flat box, it takes up a significant amount of space. However, if you carefully dismantle the puzzle, stack the pieces on top of each other, and place them into a small, compact cube, the physical footprint is drastically reduced. Crucially, every single puzzle piece is still there. When you want to view the image again, you simply unpack the cube and rebuild the puzzle exactly as it was.
This is exactly how algorithms like PNG (Portable Network Graphics) operate. They repack the data. Because zero information is discarded, you can compress and decompress the file an infinite number of times, and the pixel data will remain mathematically identical to the original source. The downside is that because it must preserve every detail, Lossless compression generally only reduces the file size by 10% to 30%.
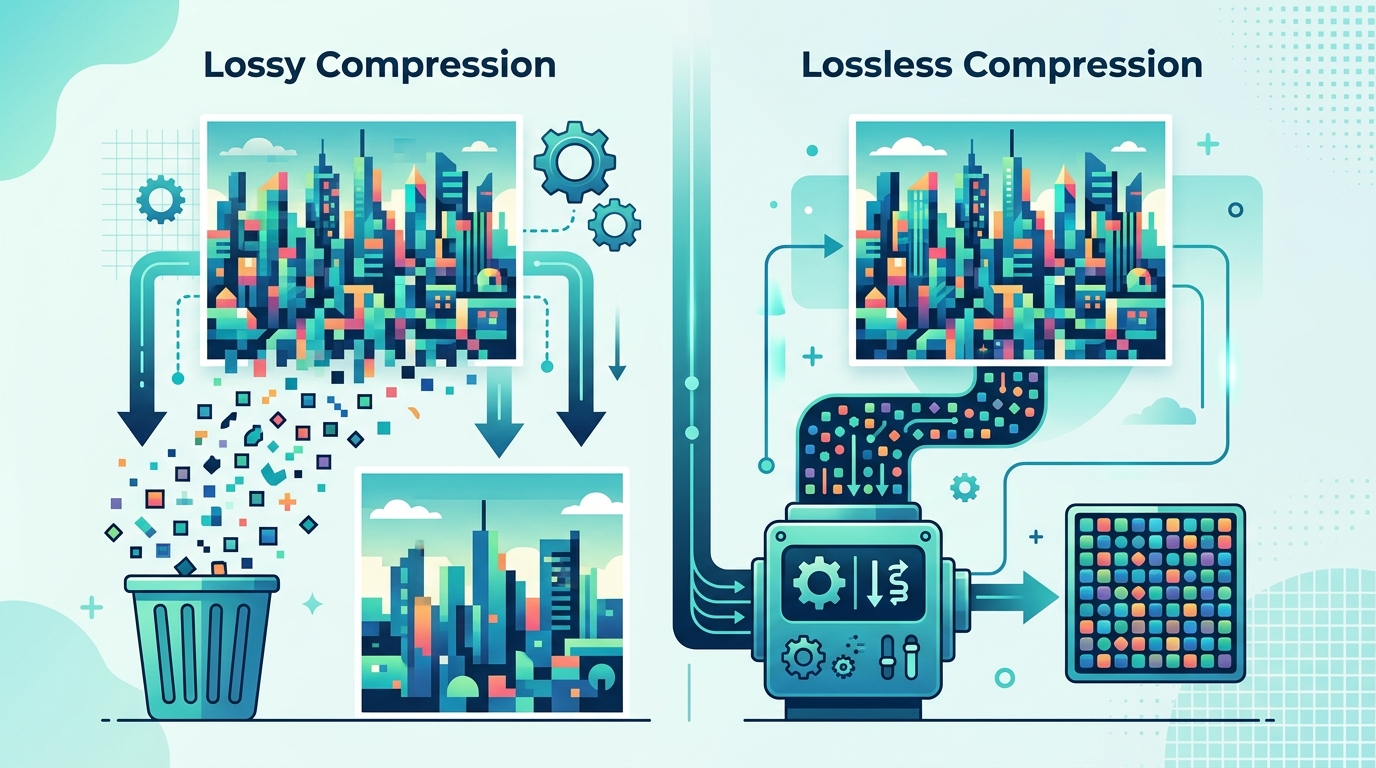
While lossless compression repacks the data perfectly, advanced lossy algorithms target and discard chrominance data that the human eye physically cannot perceive.
2. Lossy Compression: Hacking the Human Eye
If you want to achieve massive file size reductions (upwards of 80% to 90%), you must utilize Lossy compression. Formats like JPG and the modern WebP utilize this method. Unlike the puzzle analogy, Lossy compression actively discards data permanently. It throws puzzle pieces in the trash.
So how is it possible to use Lossy compression without losing quality? The secret lies in evolutionary biology and the limitations of the human visual cortex.
The human eye is incredibly sensitive to changes in brightness (luminance), but we are notoriously terrible at distinguishing between incredibly subtle shifts in color (chrominance). If a photograph features a green leaf with 40 slightly different shades of green in the shadows, your brain essentially averages them out into a single concept of "dark green."
Lossy algorithms are programmed to ruthlessly exploit this biological weakness. The software analyzes the image, identifies areas with complex, subtle color variations, and intentionally deletes the micro-details that humans cannot perceive anyway. It groups similar colors together into blocks. Because the data is permanently destroyed, the file size plummets. However, because the algorithm only targets data outside the threshold of human perception, the resulting image looks absolutely flawless to our eyes.
Pro Tip: Never compress an image that has already been lossy compressed. This is known as "generation loss." If you download a JPG from a website and compress it again, the algorithm will begin destroying visible data, resulting in ugly, blocky artifacts. Always compress directly from the original, uncompressed source file.
The Meta-Data Purge
Beyond manipulating pixels, high-quality image compressors utilize a secondary, entirely invisible method to shrink file sizes: Exif data purging.
When you take a photograph with a smartphone or digital camera, the device embeds a massive amount of hidden text into the image file. This is known as Exif (Exchangeable Image File Format) data. It includes the exact GPS coordinates of where the photo was taken, the date and time, the camera model, the shutter speed, the ISO, and even the software used to edit the image. Furthermore, the file often contains an embedded, hidden "thumbnail" version of the image for fast previewing in file explorers.
While this metadata is useful for professional photographers organizing a massive Lightroom catalog, it is completely useless—and potentially a massive privacy risk—when publishing an image on a public website. A robust online image compressor will automatically detect and purge all of this invisible metadata. Stripping out the Exif data, color profiles, and embedded thumbnails can instantly knock 10% to 15% off the total file size without touching a single pixel of the actual visual image.
Choosing the Right Format for the Right Job
The key to maintaining quality while minimizing file size is knowing exactly which format algorithm to apply to your specific type of image. Applying the wrong algorithm will either bloat your file size unnecessarily or ruin your crisp lines.
When to use JPG (Lossy)
You should always use JPG for complex, real-world photographs. Pictures of landscapes, human faces, highly textured objects, and complex shadows are perfectly suited for Lossy compression. The smooth, chaotic gradients of real life hide compression artifacts incredibly well.
When to use PNG (Lossless)
You should strictly reserve PNG for digital graphics, screenshots, logos, charts, and anything featuring sharp, straight lines and solid blocks of color. If you attempt to use Lossy JPG compression on a logo with crisp text, the algorithm will create "mosquito noise"—ugly, blurry artifacts hovering around the edges of the sharp letters. For sharp digital art, Lossless PNG is mandatory.
Frequently Asked Questions (FAQ)
1. What is the optimal file size for a website hero image?
For large, full-width hero banners (typically 1920x1080 pixels), you should aim to compress the file down to between 150 KB and 250 KB. For smaller inline images within a blog post, the absolute maximum should be 100 KB, though aiming for 50 KB is ideal for mobile optimization and fast rendering.
2. Does image compression permanently ruin the original file?
It only ruins the original file if you overwrite it. Online image compressors operate in a sandbox environment. You upload a copy of your image, the server processes the algorithms, and you download the compressed version as a brand new file. Your original, high-resolution source file remains perfectly untouched on your local hard drive.
3. What is WebP, and is it better than JPG?
WebP is a modern image format developed directly by Google. It combines the best of both worlds, offering both lossy and lossless modes, and generally produces file sizes 25% to 35% smaller than an equivalent JPG. However, it is primarily designed for the web. If you need to print an image or send it to a client who uses older software, converting a WebP back to JPG is often required for legacy compatibility.
Conclusion
Uploading raw, uncompressed 5MB photographs to a live production website is one of the most destructive mistakes a developer or content creator can make. It creates severe bottlenecks, angers mobile users with data caps, and signals to search engine crawlers that your site is unoptimized and sluggish.
By understanding the limitations of the human visual cortex and leveraging advanced lossy encoding algorithms, you can slash your bandwidth costs and speed up your page loads instantly. Stop sacrificing speed for assumed quality. Run your massive photography through a dedicated Image Compressor, strip away the invisible meta-data, hack the chrominance threshold, and deliver blazing fast content to your audience without a single drop in visual fidelity.